Tuesday, March 30, 2010

Geraniums paralyze Japanese beetles

Another rainy day in the 50s.  I’ve taken the last languishing 'house' plants outside and lined them up on the mudroom steps to soak in the rain.  The only summer container plants that really survive my brutal care are the common geraniums, Pelargonium zonale.  


I wouldn’t say they thrive on winter neglect and the bone dry potting soil that surounds their roots on the backstairs windowsills, but they live to see another summer.  They’re also the only plants that thrive in the summer under my (non)watering scheme.  I’ve been tempted to ONLY plant geraniums in previous years -- partly inspired by the incredible window boxes and containers of geraniums we saw in the Alsace Lorraine a couple of years ago.  Now there is an even better reason to fill the garden with common geraniums.

Scientists have known since the 1920s that geranium flowers appear to both attract Japanese beetles and paralyze them -- the beetles become so intoxicated by the petals they pass out for 12 to 18 hours which in the wild can be a lethal binge.

Recently UK entomologists Daniel Potter and David Held have studied this phenomenon further to discover what causes this reaction.  Japanese beetles are the scourge of home gardeners and retailers -- eating over 300 types of plants and 79 plant families.  Almost all of the states east of the Mississippi River except Florida suffer incredible financial damage from greedy beetles, and the U.S. Department of Agriculture is keen to prevent the beetles spreading to the western US where they could devastate California vineyards and crops.   An effective and earth-friendly way of exterminating Japanese beetles would be a goldmine and the geranium’s knockout punch seems to have great potential.
 "We found that when Japanese beetles fed upon the petals of geranium, generally in less than an hour the bugs enter a kind of narcotic state," says Potter. "They curl up on their back and pull their legs close to their underside. They'll twitch if you disturb them, but they're clearly in dreamland."
Funded by the USDA, Potter and Held have found that the bugs seem unable to resist geranium temptation -- when beetles were given a choice between nutritious linden plants and mind-blowing geraniums they overwhelmingly went for the geraniums and ended up on their backs.  Nor did they learn from their mistake, every time they recovered from their geranium-trip they ignored the healthy choices and chomped down on almost 10 times the previous amount of geranium petals before becoming intoxicated again.  Interestingly, geraniums grown in full sunlight packed more of a gastronomic punch for the beetles.

Potter's team also reared pairs of beetles in boxes with soil so that they could lay their eggs the beetles. One group received the healthy linden leaves, one group received the geranium petals, and one group received an equal amount of both.
"As one would expect, the group that got the linden leaves lived long and happy lives and laid a large number of eggs," says Potter. "Both groups with access to geranium spent the better part of this two-week experiment on their backs in a narcotic state, had a much higher mortality rate, and laid very few eggs."
With the help of plant chemists at Cornell, UK researchers are testing various geranium chemicals on the beetle-favorite Virginia creeper, and they've been able to duplicate the geranium's narcotic effects. Potter says that by this coming summer they'll have identified the exact extract which should be invaluable in creating effective Japanese controls.
"One of my goals is to understand the insect better," says Potter. "I think if you understand the biology of a pest insect, it opens up new avenues for management that are environmentally more responsible."
The Japanese beetle's behavior makes it an interesting insect to study, Potter says.
"I really like the Japanese beetle. It's my bread and butter insect. It's a great bug, sort of The Terminator of the insect world."
Maybe this summer I actually will create an Alsace inspired geranium display and sit back with a glass of  Riesling to watch the beetle show.

Monday, March 29, 2010

Lindera benzoin

A native shrub that has naturalized throughout our woods.  We are constantly digging up spicebushes from the woods edge as they threaten to take over the garden -- initially we tried to move them but they are notoriously difficult to transplant because of their coarsely fibrous root system and are very slow to reestablish.

This time of year they are in their glory, a wonderful chartreuse haze that brightens the woodland understory.


The Facts
Family: Lauraceae
Genus: Lindera Species: benzoin Common Name: Spicebush
Area of Origin: Maine to Ontario and Kansas, sought to Florida and Texas
Characteristics:  Alternate, simple, oblong-obovate leaves, 3" - 5" wide, light green above, pale underneath.  The flowers are dioecious, yellow and tiny, appearing late March to early April before the leaves.  Not overwhelming to look at but fabulous en masse.  The fruit is an oval drupe, about 1/2" long and scarlet but is seldom seen since it is showy only after the leaves have fallen.    The shrub grows 6' - 12' tall with a similar spread, although the national champion in the Jefferson National Forest in VA is 20' x 20'.  It's a rounded shrub in outline, rather loose and open in the wilderness of our woods, supposedly full and dense in full sun.  The leaves turn a wonderful golden yellow in the fall.
Hardiness: USDA Zones 4 to 9 
Cultivation needs: Best in moist, well-drained soils, full sun or shade, can cope with dry soil.
Typical Pests, Diseases, associated problems: None to speak of.
Propagation Method: Seed needs to be stratified, cuttings will root but percentages not high.


Sunday, March 28, 2010

Dominique Browning was the editor of House and Garden for 12 years.  It was one of my favorite magazines and I was sad when it folded suddenly, seemingly without cause.  It happened just after I left the editorial world and slid into garden design.  I used to look forward to reading Dominique's editorial letters and following her life vicariously through them.

House & Garden was a magazine that celebrated the good life, I haven't found a similar one in this country and now subscribe to the UK version.  Dominique Browning now writes a column for the Environmental Defense Fund Web site and has a new blog, SlowLoveLife.com.  Below is an extract, via the New York Times, from “Slow Love: How I Lost My Job, Put on My Pajamas and Found Happiness,” to be published next month by Atlas & Company.  It's a wonderful description of spring unfolding.


"I took to wandering in my garden at all hours. As if to give me one last chance to change my mind about leaving, spring unfolded in splendor. The daffodils multiplied generously and spilled across the front in a riot of gold. Bunches of hellebores appeared in March and nodded their prim white, mauve and purple caps for more than two months; when I bent down to turn up a small head and peer into a quiet, trusting face, I winced at the thought of leaving them vulnerable to whatever depredations a new owner might visit upon them. I apologized in anticipation. I strolled the paths, examining the thick, furry spools of the unwinding ferns; the gnarled purple fingers of the peonies clawing out from the damp, fragrant earth; the green stubs of the Solomon’s seal; the sharp tips of the hosta encircled by improbably large patches of bare ground that would soon be hidden by gigantic leaves, bearing aloft the fragrant white wands that seduce the moths at dusk......
......One adventure is over; it is time for another. I have a different kind of work to do now. I am growing into a new season. At the water’s edge, watching the tiny, teeming life of that mysterious place between high and low tides, the intertidal zone, I begin to accept the relentless flux that is the condition of these days. I am not old and not young; not bethrothed and not alone; not broken and yet not quite whole; thinking back, looking forward. But present. These are my intertidal years.
In those sleepless nights, when I am at the keyboard, I connect with something I may have once encountered as a teenager and then lost in the frantic skim through adulthood — the desire to nourish my soul. I do not have the temerity to think I have found God; I think instead that I have stumbled into a conversation that I pray will last the rest of my life."

Saturday, March 27, 2010

Camellia japonica

What a difference a few days of spring sunshine makes.  On the 21st the camellia buds were furled tight.


This morning when I made my daily rounds they were beginning to bloom.  Of course the shrubs in the supposedly ideal position in the well drained sheltered beds in front of the house are still languishing while those planted haphazardly at the edge of the woods in the back are thriving.


The Facts
Family: Theaceae
Genus: Camellia Species: japonica Common Name: Japanese Camellia
Area of Origin: Japan
Characteristics:  Alternate, simple, evergreen, ovate leaves, 2" - 4" long with a firm leathery almost plastic texture.  The flowers are perfect, mainly non-fragrant, solitary and come in white, pink, rose, red and every conceivable combination included variegated.  Their biggest enemy is the cold which turns the flowers to brown mush -- they're exquisitely beautiful when not adulterated by the weather.  The bushes themselves form a dense pyramid of lustrous dark green foliage, some cultivars are more graceful in form than others but on the whole they form a stiff, formal splodge of green.
Hardiness: USDA Zones 7 to 9 (though we're 6, hence the very sheltered position).
Cultivation needs: They transplant easily from containers but I would caution against planting in the fall.  The first year we moved here I excitedly planted half a dozen and lost all of them that first winter. They seem to do much better when planted in the spring.  They prefer moist, acid, well-drained soils with high organic content.  It's advisable to mulch as the roots are shallow, they should be sited in partial shade as too much sun or shade affects the flowering -- which is really the only reason you'd plant them.  Prune after flowering.  It's important to choose cultivars carefully and pick one that is hardy in your area.
Typical Pests, Diseases, associated problems: Spot disease on leaves, black mold on leaves and stem, leaf gall, flower blight, leaf cankers, tea scale, mites, cut-worm, mealy bugs, weavils, thrips, numerous other insects, chlorosis, sunburn, oedema, physiological disorders including bud drop .... I'm glad I didn't read the list before planting.
Propagation Method: Seed requires no pretreatment if taken from the capsules and planted immediately.  If allowed to dry out they need to be covered in hot water and allowed to imbibe for 24 hours before being planted in seed flats.  Cuttings are best collected from May to September and in the fall.  Also good grafted and air-layered.


Friday, March 26, 2010

Vining peas

The last of the peas are planted.  I reused last year's tomato stakes and nailed 1" x 3" lathes to the top to secure the trellis.  My fingers froze again as dug the trenches.

Thursday, March 25, 2010

Planting peas

The first of the peas went in today.

2000 peas to be exact, two 40' rows of shelling peas "Strike" (one of the earliest and just 24" high) and two rows of "Caselode" which is one of the sweetest shelling peas and slow to turn to starch when the weather warms so although producing later it has a long harvesting time. Better late than never, but definitely late.   Peas are normally planted around St Patrick's day (March 17th) or as soon as the ground is workable and has had a chance to dry out a bit after winter.   It will be a few weeks before they look like the crop below

I dusted them with a bacterial inoculant to help increase yields and then zigzagged the seeds 1/2" apart in a 3" shallow trench.  It's always good to follow the old tale of one for the mouse, one for the crow, one to rot and one to grow.  To safeguard against mice it's a good idea to cover them wire netting, although I must confess I never do.  

I love shelled peas, harvested and eaten straight from the vine, there is nothing like them and buying the dried out starchy pretenders available in stores comes nowhere near the real thing.   Peas are cool-season performers and you have to plant a lot to ensure a good size pea harvest once they’re shelled -- hence the thousands planted today.  Not that I plan to actually eat all that I plant, they freeze well and this year I tend to extend the growing season by harvesting and eating some of the young pea shoots and tendrils.

All parts of the pea plant are edible. As the pea leaves and stems mature, they tend to get tough and stringy. But when they are young, the pea shoots with their curling, clinging tendrils are tender and delicious.  The great thing is that although they look exotic and sophisticated on the table even gardeners who can’t grow peas to maturity can grow pea shoots and tendrils.

There’s no trick to growing pea shoots and tendrils.  Just seed extra so you have some to harvest early. Since the plants you sow for shoots and tendrils won’t need as long a growing period, you can reseed up to about 1 month before the warm weather sets in.

Once the pea plants are about 6" - 8" tall, you can snip off the top growth including one set of leaves. This will be your first, small harvest, but cutting off the growing tip will encourage the plants to branch out and continue growing.

After that, you can continue harvesting the top 2" - 6" of the pea plants every 3 - 4 weeks. You can harvest shoots, leaves and tendrils as well as any flowers or buds that may have formed.  Eventually the plants will cry uncle and start to turn bitter, best to stop harvesting at this point.  Last year the weather was so cool I actually got pea pods forming on these plants, most years the pea season is well over before then.  No worries, you can replant from seed in mid-August for a fall crop.

Wednesday, March 24, 2010

Daphne odora

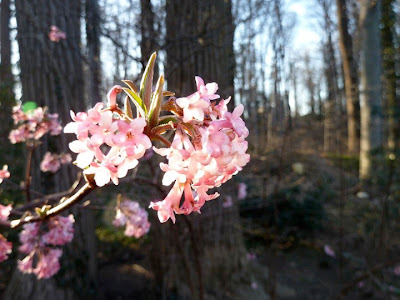
I first encountered Daphne odora at an open garden in Devon 10 years ago this month.  The fragrance wafted across the garden, I traced it to this compact gloriously flowering shrub that I HAD to have. 


I bought a plant on the spot from the garden's small shop and carried it through Devon and back to Buckden where I kept it in a pot and then gave it to my mother-in-law when we moved. It was one of the first shrubs I bought when we moved here.  I have it in the shrub border by the kitchen window where I can breathe it's fragrance deeply when I venture out the mudroom door and can open the kitchen window and fill the room with scent.


The Facts
Family: Thymelaeaceae
Genus: Daphne Species: odora Common Name: Winter or Fragrant Daphne
Area of Origin: China
Characteristics:  A densely branched, mounded evergreen shrub that reaches 4' (6') in height and width.  Alternate, simple, evergreen, leathery, elliptic-oblong leaves.  The fragrant, rosy pale pink/white flowers are borne in 1" diameter, terminal heads with up to 10 florets during February - March.  They last a long time and the fragrance is wonderful.  Fruits are supposedly red but I've never seen one.  It performs well in shade and is not meant to be as finicky about soil as other Daphne species.  Dirr says "What a wonderful plant!  Temperamental, trying, but worth all the attention."
Hardiness: USDA Zones 7 to 9 (though we're 6, hence the very sheltered position).
Cultivation needs: Temperamental, reportedly short lived, prefers part shade. They dislike disturbance and once planted should be left there.  Sometimes they die for no apparent reason, very fastidious about culture, overly wet soil appears to doom them.  Still a plant of the first order that is absolutely stunning in flower
Typical Pests, Diseases, associated problems: leaf spots, crown rot, twig blight, canker, viruses, aphids, mealybug and scale.
Propagation Method: Dirr used to think propogation was as "easy as cutting warm butter" but now claims to have varied success.  Timing seems to be important when gathering cuttings, covered frame and shade cloth etc.  To the nursery I go.


Tuesday, March 23, 2010

Pieris Japonica

Now gloriously in bloom.  I spent a sunny hour pruning out dead wood and old seed pods on our patio tree.


The Facts
Family: Ericaceae
Genus: Pieris Species: japonica Common Name: Pieris
Area of Origin: Japan, China, Taiwan
Characteristics:  An excellent large specimen broadleaf evergreen that can work well in the shrub border, on mass or with other broadleaf evergreens.  Dirr claims it grows 9' - 12' tall with a 6' - 8' spread, and is slow growing, 4' - 6' in 5 to 8 years.  Our patio tree is a least 15' tall and 10 wide.  The leaves are alternate, simple, crenate-serrate and lustrous dark green above with lighter green beneath.  The new growth is a rich bronze and the new foliage on some of the new cultivars such as 'Mountain Fire' is spectacular.  The trunk is vertically fissured and attractive.  The flower buds form in the summer prior to flowering, the flowers themselves are perfect, weakly fragrant, white, urn-shaped borne in 3"-6" long and wide, pendulous, racemose panicles.  The dehiscent fruit capsules are messy and best removed after flowering.  

Hardiness: USDA Zones 5 to 8.
Cultivation needs: Easy to grow, likes moist, acid, well-drained soil and prefers full sun to partial shade which ours now has but until we cut the large oak from the center of the patio was in full shade.  According to Dirr it does not grow old without a struggle and needs to be sheltered from the wind.  There are loads of cultivars flooding the market now, compact, red new foliage, pink flowers, red flower buds etc etc.
Typical Pests, Diseases, associated problems: Leaf spots, die back, lace bugs -- this is a real menace in our neck of the woods.  The bugs suck the juices from the leaves and cause yellowing to browning of foliage.  Also Florida wax scale, two-spotted mite, nematodes.  Still worth the effort.
Propagation Method: Seed or cuttings which root easily.  That's if you want to wait years for a stick to grow.

Monday, March 22, 2010

Corylopsis glabrescens

Flowering now, I fell in love with this shrub at Winterthur where Dupont planted a long walk of corylopsis or fragrant winterhazel underplanted with helleborus.  More subtle than the yellow of forsythia, the fragrant flowers glow in spring sunshine and are complemented wonderfully by the smokey purple hellebores.


The Facts
Family: Hamamelidaceae
Genus: Corylopsis Species: glabrescens Common Name: Fragrant Winterhazel
Area of Origin: Japan
Characteristics:  Another large multi-stemmed deciduous spring flowering woody shrub (usually 8' - 15' tall with a similar spread) which is somewhat flat-topped, rounded.  Simple, ovate, alternate leaves are 2" - 4" long and have bristle-like teeth a wonderful chartreuse color in spring turning dark green.  Fall color varies from yellow-green to clear gold.  The flowers are perfect, pale yellow and fragrant, borne in 1" - 1 1/2" long pendulous racemes and flower from March - April before the leaves.
Hardiness: USDA Zones 5 to 8.
Cultivation needs: Easy to grow, prefers full sun to light shade, ours is at the edge of the woods and in summer months is in fairly deep shade.  Likes moist, acid, preferably well-drained soil that has been amended with peat moss or leaf mold.  It's a great plant for early spring color and fragrance and can be successfully integrated into shrub borders.  It's best planted in front of an evergreen background so the flowers really pop.
Typical Pests, Diseases, associated problems: Like most members of the family it is free from significant problems.
Propagation Method: Seeds are difficult and require a 5 month/3 month warm/cold period so well beyond my patience.  Softwood cuttings root easily and can be gathered throughout June, July and August with a 90% success rate when dipped in rooting hormone.  However, Dirr notes that the cuttings are resistant to moving and should go through a dormancy cycle before transplanting.  


Sunday, March 21, 2010

Weekly Reminder -- March 21

A Check List of Timely Tasks


  1. Next week should be a great time to sow a range of vegetable seeds directly into the ground; carrots, spinach, lettuce, rocket, peas and broad beans.  The soil has had a week of above average temperatures to warm and dry it.
  2. Most vegetables can be sown straight into their growing positions, it's important to thin them out as soon as possible which is something I find hard to do.
  3. Leeks, cabbages and broccoli are best sown in a seed bed and then transplanted into their final positions later, spaced well apart.
  4. After digging or tilling the planting beds you need to prepare the soil surface for seed sowing by thoroughly raking the soil and removing large stones and debris.  This creates a fine tilth -- great old English word meaning:- "the condition of tilled soil especially in respect to suitability for sowing seeds.  From the old English tilian [strive for, obtain by effort,] of Germanic origin; related to Dutch telen ‘produce, cultivate’ and German zielen ‘aim, strive,’ also ultimately to till. The current sense dates from Middle English"
  5. Seed packets give good advice on planting depths and distances. In general, larger seeds such as peas should go 2in deep, while fine seeds need only a shallow covering of soil.
  6. Use string to make a taut, straight line and run the back of a rake or hoe along it to carve out your drill.  Alternatively you can place a cane or stake across the bed and lightly push it into the surface to form a straight drill (shallow depression).  The depth should be as directed on the seed packet. The drills should be spaced according to the instructions on the seed packet.
  7. Add water to the row before sowing.  This is usually better than watering over the top of sown seeds. 
  8. Thinly scatter the seed into the bottom of the drill. Don’t be over enthusiastic, as plants will need thinning to the spacing recommended on the seed packet. A finger width apart is usually right for small seeds.
  9. Use a rake to gently cover the seeds with soil, filling the drill back in again. 
  10. Before you forget where the row is and what you’ve sown, place a label in the soil at one end.
  11. Cover the patch with a single layer of fleece to protect against frost. Use a spade to push the edges of the fleece into the ground to ensure it doesn’t blow away, I also add staples to the edges so the wind doesn't catch it. 
  12. Remember to water in dry spells. 

Saturday, March 20, 2010

Spring soil

It's a deliciously mild spring morning, temperatures in the 40s before 9:00am and promising to soar into the 70s today.

The chickens are adjusting grumpily to their new location outside the vegetable garden and the straw littering the beds has been dug in with a sprinkling of milorganite as added fertilizer.  I'll let the turned soil sit for a day before raking in preparation for sowing peas and planting out the trays of kale and cauliflower I've moved from the potting shed to the cold-frame to harden off.


Ideally peas should be sown by St Patrick's day, but although the weather is now glorious it was such a cold wet winter the soil needed the warm days last week to dry out before being worked.

Some spring tasks you can write in stone -- sowing tomato seeds 8 weeks before the last predicted frost in the area.  If frost still threatens after planting out the new seedlings can be covered with fleece and survive.  Sown too early, you risk thin straggling plants that have stretched too long for light.

Other spring tasks are a moveable feast, if the winter is as wet and cold as this year's even if the weather is suddenly glorious the ground may still be too wet to sow or plant any edible crops.

The classic test is whether the soil sticks to your boots.  If it does, wait a couple of days until there is 'tanning' on the soil surface.

There's still plenty to do -- the soil might be too wet to dig but will be easier to edge.  Neatening edges and weeding now greatly improves the garden going forward.  The best way to edge is to use a moon-shaped cutter and angle the tool slightly outwards rather than straight down.  This exaggerates the edge and makes it look deeper. It also improves drainage and helps to prevent the weed seeds congregating in the groove at the bottom.

Friday, March 19, 2010

Sweet Peas -- lathyrus odoratus

The final Sweet Peas are sown, 3 to a 3" pot.   Too late of course, they thrive in cool weather and should have been sown in early february and be ready to be set out now the soil is warming.


Grey, one of the barn cats kept trying to help, although luckily she didn't eat any of them as they're poisonous.  After a while she gave up, disappeared briefly and appeared at the utility door with a plump mouse as a present!

I'm hoping for a long cool spring, long cool summer too if I'm going to have much luck picking flowers. I'm trying old and true varieties such as Elegant Ladies to some newer ones such as Rosemary Verey and Midnight , shown below

Sunny spring day

A beautiful day with temperatures reaching the low 70s.  The ground has thawed quickly and we've started to dig the vegetable garden for planting.  An old stone wall, lichen and moss covered with a cap of euonymus was stunningly beautiful in early spring sunlight.

Thursday, March 18, 2010

The new American Chestnut

The American chestnut tree was once king of the forest and was found from Maine to Georgia and as far west as the Ohio Valley.  The once stately hardwood played a vital role in the ecosystem, important to wildlife, native cultures, settlers and generations of wood-based industries.

Then, in the late 1800s disaster struck in the form of an imported Asian fungus which quickly killed a staggering 99.9% of the species.  By 1950 less than 100 trees remained of the estimated original four billion on the eastern seaboard.

Restoration attempts started over 100 years ago, as early as 1912 there are records of high level meetings to discuss blight containment strategies but despite significant research a cure has yet to be discovered.

The American Chestnut Foundation has been leading the fight to restore the American chestnut tree to it's native range within the woodlands of the eastern United States using a scientific research and a back-crossing breeding program developed by its founders.  They have over 6,000 members helping to bring it back from the brink of extinction.  The first  blight-resistant nuts were harvested in 2005 and the foundation hopes to begin restoration trials with blight-resistant American-type trees before the end of this decade.


For the first time their Annual Sponsor members have access to their potentially blight-resistant seeds.  These seeds represent 26 years of their best science and are being sent to members for testing and evaluation only.  Although they are not guaranteeing they will be resistant to the chestnut blight by planting the seeds you become part of their science team in helping TACF researchers improve resistance.


My seeds arrived yesterday and have started to germinate!


Now I just have to coddle them for the next few years, record their height and diameter at year one, three, five, ten and  every five years thereafter.

For now I've potted them up and nestled them with some other seedlings in the potting shed until ready to plant outside.

Wednesday, March 17, 2010

Snowdrop bank

This time of year I love this house, with the thousands of snowdrops colonizing its front back.  I keep meaning to ring their doorbell and ask if I can dig some up and have them colonize down the road in my garden.


It's a fleeting beauty, a few days in the 60s and they are already fading.

Tuesday, March 16, 2010

Spring blooms

The first robins on the lawn this evening when I returned from work.  A great sign.  Outside the kitchen window Chionodoxa luciliae (Glory of the Snow) are blooming alongside Crocus tommaainianus, hellebores and snowdrops.


I've moved all the plants from the kitchen windowsill so I have an unobstructed view of the bulbs outside.

Monday, March 15, 2010

Ribes sanguineum

The Ribes sanguineum (Winter or Flowering currant) I planted years ago as a tiny stick from Forest Farms has begun to flower.


The Facts
Family: Grossulariaceae
Genus: Ribes Species: sanguineum Common Name: Winter currant, Flowering currant
Area of Origin: Pacific northwest
Characteristics:  It's a large deciduous spring flowering upright woody shrub (usually 6' - 12' tall with a similar spread) which can be leggy with age.  The dark green leaves are lobed and very textured. Fall color is not noteworthy, sometimes the leaves have reddish overtones, usually they just turn brown and drop off.  The flowers are meant to have a spicy fragrance (very light in mine) and are are beautifully intricate, hanging in delicate clusters of red, pink or white.  Some plants can form clusters of fruit with a heavy wax coating that leaves them looking bluish-gray.
Hardiness: USDA Zones 5 to 8.
Cultivation needs: Easy to grow, prefers part shade, ours is at the edge of the woods and in summer months is in fairly deep shade.  It should be pruned after flowering to shape it and remove unwanted branches.  I planted several a few years ago, my favorite is Ribes sanguineum "King Edward VII", a cultivar with red flowers that stays slightly shorter than most winter currants.
Typical Pests, Diseases, associated problems: Can get scale insects.
Propagation Method: From hardwood cuttings, seeds direct sown outdoors in fall or indoors before last frost or simple layering

Sunday, March 14, 2010

Heptacodium miconioides and garden journals

One of the most valuable tools in gardening is keeping a journal. Jotting down notes about weather and bloom times makes for fascinating reading a few years later and helps in planning the garden as you can see where there are dreary gaps in blooms that need to be filled in.

My journal keeping has been dismally sporadic, I wish I'd been more thorough.  I found notes from March 14th 2007, a Wednesday, and read that it was:-
"78 degrees today -- insanely, wonderfully warm.  I wish I could have spent the day outside, but did get out to prune for an hour in the morning.  The tail end of pruning season, we pruned back old butterfly bushes and cut out old and crossing branches of the Heptacodium miconioides at the Barnes.  It’s one of my favorite trees, with a great bark in the winter, creamy white fragrant flowers in late summer followed by bright pink calyces that are even more striking than the flowers.  Seeds are doing great -- tomatoes, eggplant, cabbages and peppers have all germinated.  Time for the next round.."
Two years on it's 20 degrees cooler, drizzling, I haven't finished my pruning chores, seeds have JUST been sown and are no where near germinating.  Ah well, Heptacodiaum miconioides is still one of my favorites and the specimen I planted in our garden is doing splendidly. 

The Facts
Family: Caprifoliaceae (Honeysuckle Family)
Genus: Heptacodium
Species: miconioides
Common Name: Seven Son’s Flower, Heptacodium

Area of Origin: China

Characteristics:  It's a small tree (usually around 15 to 20′ tall although ours is already reaching this), whose branches arch slightly but can be leggy with age.  The leaves are opposite, entire, ovate with heart-shaped bases and acuminate tips.  There is no fall color to speak of, but the  pink sepals provide wonderful autumn interest and the leaves hold late into the season. The flowers are fragrant and can be either white or a soft pink and hold up through the heat of August to first frosts. The sepals continue to grow as the flower fades and are a gorgeous vibrant pink. The bark is beautiful; lots of texture and peeling with deep rich browns.


Hardiness: USDA Zones 5 to 8.

Cultivation needs: Fairly adaptable -- although the one at the Barnes is wedged between the parking lot and road and does not look too healthy.  It grows in full sun to part shade, likes well drained soil (loves our slope) and tolerates some drought.  It prefers a slightly acidic soil.

Typical Pests, Diseases, associated problems: Nothing serious I know of.

Propagation Method: Its meant to root easily from softwood cuttings and can also be grown from seed  Both would take years, and it is now widely available at good nurseries which is a much faster way to enjoy it in your garden.


Rhubarb shoots


A break in the drizzle and we took a brief walk to the Harriton House to examine our garden allotment.  Dead brussels sprouts, a sprawling sage and a few onions, all fairly dismal.  But the first signs of rhubarb poking out of the mud was a hopeful sign.

Saturday, March 13, 2010

First seeds sown

A miserable rainy day with flood warnings across the area.  At least the last of the snow has disappeared although I can't imagine when the soil will be friable enough to plant.

My light stand is assembled, heat mats turned on, timer set and lights are working.  It's an impressive looking structure.

I spent the afternoon mixing potting soil and sowing the first of the seeds.  Heirloom and some hybrid tomatoes, peppers, eggplant and a couple of trays of lettuce.

I also took a chance on sowing some artichokes -- a bit late but hopefully I'll be able to transplant them into the garden while we still have some nights below 50 degrees.  They don't like frost but they do need about 250 hours of temperatures below 50 to set buds or you get great foliage but not much to eat.

Every time I opened the utility door the cats rushed in and nosed around the seed.  A satisfying afternoon.

Friday, March 12, 2010

Light stand arrives

The UPS truck dropped off four large boxes from Harris Seeds, and a couple of smaller boxes with additional heat mats and self watering trays.  I gathered everything together and lugged it to the farm to set up.  After some deliberation we decided the best place for the seeds was in the stable's utility room.


I have a bank of outlets, plenty of places to ground the lights and a nearby wash room to mix my potting soil and water the seedlings.


Now I just have to figure out the boxes and set everything up.  At least there's music from the stable's boom box, and the barn cats and horses to keep me company.

Thursday, March 11, 2010

Seed Organizers

I've found over the years that having a planting schedule doesn't necessarily mean I actually remember to get the seeds in the ground at the right time.  I start the season with great intentions to be incredibly organized and sow successive planting of different vegetables so I can enjoy extended harvestings of each crop, then during the hectic summer planting months the weeks slip by and my weekly sowings of carrots, lettuce etc have gone by the wayside.

At the end of the planting season it is great to store left-over seed in a cool dark place.  My old Burgon & Ball seed storer does wonders in keeping my remaining seed safe in an airtight box, it looks great and has handy monthly dividers to separate the seed and keep them in one place when not needed.


The trouble is most of my seeds need to be planted in the months of March - May, so jamming them all in one mass is guaranteed to ensure they linger in the box after the first sowing.  I've tried filing them in photo boxes, separated by dividers, but out of sight they become definitely out of mind

I thought this year I'd buy clear plastic shoe organizer, mark each row with a month and then each shoe slot in the row label week 1, week 2 ...  I can hang in on the wall in clear view where I can't overlook it and then sort through the seed packets, read the backs to learn the planting times, pop the seed in the right slot and then hopefully never miss a planting date again.


It should also make organizing the seeds as they arrive easy as I can put them in the right planting week as soon as I open the box.  Once sown I can either leave them in their original slot or move them into the next week if I plan to sow them again.

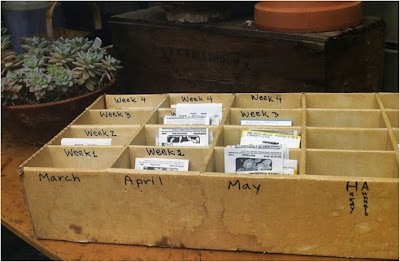
An alternative would be to create an open box I could put on the potting shed bench that does the same thing.  Trouble is that takes finding a box and compartmentalizing it into sections instead of clicking 'buy' on amazon and not having to leave my armchair.  For the less lazy, a box like the one below would do the trick nicely.


It's the official Victory Garden seed box that belonged to the very first VG host James Underwood Crockett.  A wonderful mix of Yankee frugality and common sense which helps to create gardening magic each spring.

Wednesday, March 10, 2010

Seed Timetable


If I had my lights set up already, this is the time-table I would be following:-

Vegetable/Herb Seed Starting Timetable (Listed in weeks before the last frost)
Twelve Weeks: Cardoons and Brussels Sprouts

Eleven Weeks: Leeks, Artichokes and Cauliflower (transplant out four weeks before the last frost date)

Ten Weeks: Celery, Celeriac, Jicama and Lemongrass

Nine Weeks: Broccoli, Cabbage and Kohlrabi (transplant out four weeks before the last frost date)

Eight Weeks: Eggplant, Tomatoes, Chiles, Sweet Peppers, Chives, Sage, Stevia and Thyme

Six Weeks: Asparagus, Fennel, Onions, Rhubarb, Shallots, Tomatillos and Basil
Four Weeks: Melons, Bitter Melon and Cucuzzi Edible Gourds.


Flower Seed Starting Timetable (Listed in weeks before the last frost)
Twelve Weeks: Datura, Salvia and Viola.
Ten Weeks: Dianthus, Digitalis, Lobelia and Heliotrope

Eight Weeks: Milkweed, Coreopsis, Gaillardia, Globe Amaranth, Helichrysum, Hibiscus, Hollyhock, Heuchera, Nigella, Platycodon and Statice

Six Weeks: Cutting Ageratum, China Asters, Celosia, Cleome, Coleus, Nepeta Catmint, Euphorbia, Forget-Me-Nots, Dahlia, Nicotiana, Scabiosa, Snapdragons and Thunbergia


Next year!

For this year I'm cheating and have ordered Brussels Sprouts, Leeks, Cauliflower, Celery, Broccoli, Cabbage and Kohlrabi from Deep Grass Nursery who produce great certified organic vegetable transplants.  I sat next to Bruce and his wife (the owners) at a PASA conference dinner last year.  They're great people, have been in business for over 25 years with greenhouses in Southern Delaware and they ship all over the country.  Traditionally they have served market gardeners, CSAs and farmers, this year they've added home gardeners to their client base and ship transplants in quantities fewer than trays of 62 which can be daunting to consume for a family of 5.


Tuesday, March 9, 2010

Seed overdose

I’m overwhelmed by seeds, seduced by all the luscious catalogs that flooded the mailbox when snow was thick on the ground.  A week curled up in front of the fireplace turning pages glowing with glossy photos of ripe, delicious looking vegetables and gorgeous brightly colored flowers has led to a daily onslaught of seed deliveries.  Boxes from Johnny's (my favorite), Thompson and Morgan and Burpee which now fill me with trepidation.

They litter the rooms, still in the packing boxes and envelopes, and I have others left over from last year that I keep finding in odd drawers and corners of the garage.  It happens every year despite my best intentions.  What’s worse is finding those crumpled envelopes of seeds gathered from my garden or friends gardens that I mean to label or am SURE I’ll remember what is inside.

I couldn’t face starting seeds under home-rigged lights in the garage again so ordered a professional light stand which was promised by mid-February but is yet to arrive. Now I’m panicking because as we’re in zone 6 I’m already late in starting sowing inside according to the chart below.

General Seed Starting Timetable: Eight weeks prior to last frost date

Horticultural Zones 9 & 10:  Start seeds indoors now.
Horticultural Zones 8:  Start seeds indoors in early February.
Horticultural Zones 7:  Start seeds indoors in mid February.
Horticultural Zone 6: Start seeds indoors in late February.
Horticultural Zone 5: Start seeds indoors in early March.
Horticultural Zone 1-4: Start seeds indoors in mid to late March.

Monday, March 8, 2010

Spring weather at last

For the first time this year it actually feels like Spring, blue skies, sunshine and a balmy 54 degrees.  The snow is beginning to melt, exposing broken branches, and the first signs of spring flowers.  The snowdrops are blooming and underneath the ratty leaves of the hellebores buds are beginning to appear.

The hellebores tired browning leaves have served their purpose and can be cut back.  In past years I've cut a third back in November, leaving some leaves to provide nutrients to the plant, then pruned back again in January.  This year I did get around to pruning off some of the leaves on a warmish day in January but actually regret it as those hellebores were battered by the snowstorms that followed.  The old leaves protected the new tender foliage and unfurling buds of the plants I didn't get around to pruning and they survived in much better shape.

It is important now to go around with at pair of sharp felcos or pruners and remove the old foliage or the plants look hideous during their peak bloom months.